End-to-End Tutorial: A Policy-Gated Dataset Example
This tutorial walks you through the entire flow using a web UI. By the end of this tutorial, a Dataset User downloads a dataset from a Guardian. Specifically, the Guardian protects access to the dataset published by a Dataset Owner. The Dataset Owner has registered specific policies (i.e., rules) for downloading the dataset. The Dataset User is able to perform the specific operation (i.e., download dataset) only when they present the valid credentials (i.e., issued by Trusted Issuers) and satisfy the Dataset Owner's policies.
The story
A research institution publishes a medical dataset but aims to share it only with individuals that meet specific policies. Rather than vetting each requester manually every time, the institution registers the policies to their dataset and lets the Policy Fabric enforce them automatically.
Three personas participate in this tutorial:
- A Trusted Issuer who can provide digital credentials (e.g., university registrar, identity provider, government, etc.).
- A Dataset Owner who publishes the dataset behind those policies (e.g., research institution, data broker, etc.).
- A Dataset User who wants to download the dataset (e.g., researcher, student, company, etc.)
The policies for the dataset
In this tutorial the Dataset Owner attaches the following two policies to the dataset. Both must hold for a Dataset User to download the dataset:
- The Dataset User must reside in a specific country (i.e., geographic rule): the user's physical residence address must be in an allowed country — in this tutorial it is US.
- The Dataset User must be affiliated with a specific organization (i.e, institution rule): the requester must belong to an allowed institution — in this tutorial it is
did:example:best_university.
What you'll do in this tutorial
- The Trusted Issuer creates two issuer objects. The first issuer object hand-signs two credentials for the Dataset User — a credential claiming the user resides in a certain country (i.e., US), and one claiming they belong to a certain institution (did:example:best_university). The second issuer object is an automatic issuer object, it will automatically issue the Dataset User a
publicKeyCredential, the moment the user actually requests the data, so the data can be sent back to them securely. The issuance depends on cryptographic evidence that binds a session key of a user to their wallet, hence it can be automatic. Important: the signed credentials alone don't unlock access to the dataset. The policy object protecting the dataset will unlock access to the dataset only if the credentials contain suitable claims AND if the credentials are signed (i.e., vouched by) an issuer object trusted by this policy object. - The Dataset Owner publishes the dataset — starts a Guardian that holds the dataset, attaches the two policies, and declares that it trusts both issuer objects the issuer created (one for the location/affiliation credentials, one for the publicKeyCredential (session key)).
- The Dataset User requests the dataset. Along the way, the app automatically obtains a session key through the Trusted Issuer object set up for it. The policies are then checked automatically by the Policy Engine; because the Dataset User qualifies, the file comes back encrypted for their session key and is decrypted for them on screen.
3 Personas
Everything runs against a single client identity at a time. This means you change roles by switching the identity in the navbar. The 3 roles are:
| Role | What they do |
|---|---|
vc_issuer |
is the Trusted Issuer. They create two issuer objects: one hand-signs location and affiliation credentials to the Dataset User, and one automatically issues the Dataset User with a publicKeyCredential for a fresh session key when they later download data. |
data_owner |
is the Dataset Owner. They publish it behind a guardian and a set of policies, and decide which issuer objects to trust. |
data_user |
is the Dataset User. They present their credentials, and if the policies are satisfied, download and decrypt the dataset. |
🔁 "Switch identity" callout — Whenever you see this, use the Identity dropdown at the top-right of the navbar and pick the username. The page reloads as that identity and returns you to the home page.
Useful terminologies
- Wallet — your personal container for credentials; owners, issuers, and users each have one automatically. It has a unique id (a DID) like
did:pdo:…. - Issuer object — something you create explicitly (on the Issuers page, via + Create Issuer) when you need to vouch for people or hand out session keys (i.e., when you play the role of a VC issuer). There are two kinds:
- Manual — hand-signs arbitrary credentials when you manually click the signing button.
- Session-key issuer object (labeled Session Key where you pick it in the app) — doesn't sign credentials by hand. Once a policy trusts it for
publicKeyCredential, the app calls on it automatically at download time to issue the requester a fresh session key and apublicKeyCredentialfor it, so they can securely receive data.
- Credential — a signed statement about someone (e.g. "this person is in the US").
- Session key — an RSA key pair the app generates automatically for the user, via a trusted session-key issuer object, the first time it's needed for a download. Data is encrypted to the public half; only the matching private half (kept locally) can open it.
- Guardian — a service that holds the actual data file and hands it out (encrypted) only once a request has been approved.
- Policy — the owner's policies, enforced automatically. When a user asks for the data, the policy checks their credentials and, if they qualify, approves download.
Part 0 — Start the Demo App
Running in cloud via GitHub Codespaces
You can launch a preinstalled Codespace cloud environment by clicking this button:

The devcontainer automatically brings up the policy engine, registries, and the webapp, and creates the tutorial data file for you. The first start pulls several images, so give it a few minutes — progress shows in the Codespaces log.
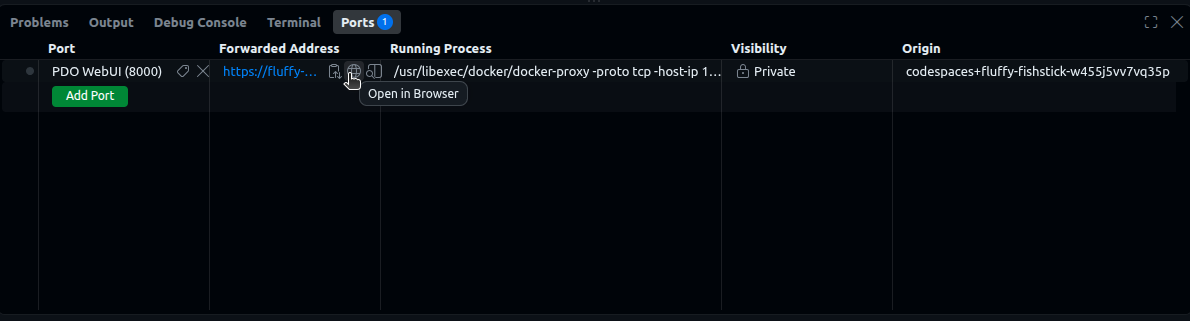
When it finishes, click the forwarded port 8000 (in the Ports tab) to open the webapp. Hover the forwarded address and click the globe icon to open it in a browser. Then follow the steps below.
Part 1 — Dataset User extracts wallet DID
We start with the Dataset User because the VC Issuer (Part 2) needs the Dataset User's wallet DID (i.e., the identity of the user the credentials belong to) before it can issue anything for them.
🔁 Switch identity to
data_user.
1.1 Copy your wallet's DID
- Go to Wallets (navbar) → click Open on your wallet.
- Under Wallet Info, click Copy next to the DID.
📋 Keep this as
USER_DIDin your notes. The issuer uses it as the Subject DID of every credential it signs for the user.
What's happening in the background: the wallet is the user's identity on the policy engine and the place their credentials will live.
Part 2 — VC Issuer creates issuer objects and issues user's credentials
You'll create two separate issuer objects here: a manual one, which signs two credentials by hand about data_user, and a session-key one, which you set up once and otherwise leave alone — the app calls on it automatically later, in Part 4.
🔁 Switch identity to
vc_issuer.
2.1 Create manual issuer object
- Go to Issuers (navbar) → + Create Issuer.
- Name: e.g.
credential issuer. Issuer Type: Manual. → Create. - Open it and click Copy next to its DID.
📋 Keep this as
ISSUER_DIDin your notes. You'll use it in Part 3.2, to tell the Dataset Owner to trust it.
What's happening: A wallet — as we discussed before — can be used as a container to store credentials. An issuer object, on the other hand, holds signing keys so its owner can issue credentials by signing them: anything it signs can be traced back to it and checked for authenticity.
2.2 Create session-key issuer object
- Still on Issuers → + Create Issuer.
- Name: e.g.
key issuer. Issuer Type: choose the option labeled Session Key. → Create. - Open it and click Copy next to its DID.
📋 Keep this as
BINDING_DIDin your notes.
What's happening in the background: unlike the manual issuer object, this one has no "Sign Credential" button — it doesn't hand-sign anything. Once the owner trusts it for publicKeyCredential (Part 3.2), the app calls on it by itself the moment any data_user requests the data (Part 4): it issues the user a fresh session key and a publicKeyCredential for it automatically, so the data can be sent back to them securely. There's nothing more to do with it right now.
2.3 Issue the LocationCredential
- On the manual issuer object's page (from 2.1) click Sign Credential.
- Fill the modal:
- Credential Template:
LocationCredential - Subject DID: The
USER_DIDthat you kept in your notes (from step 1.1) -
Claims:
-
Click Sign & Issue — the credential is signed and stored in the Dataset User's wallet automatically.
What's happening in the background: this attests the subject's country is US. You, as a VC issuer, signed a verifiable statement saying that data_user's (which is identified by their DID) location is in the US.
2.4 Issue the AffiliationCredential
- On the manual issuer object's page → Sign Credential.
- Fill:
- Credential Template:
AffiliationCredential - Subject DID: The
USER_DIDthat you kept in your notes (from step 1.1) -
Claims:
-
Sign & Issue — stored in the user's wallet automatically.
What's happening in the background: this attests the subject belongs to did:example:best_university. You, as a VC issuer, signed a verifiable statement saying that data_user (which is identified by their DID) is a member of did:example:best_university.
Both credentials are now in data_user's wallet. (Switch to data_user and open your wallet if you want to see them under Stored Credentials.)
Important: the signed credentials alone don't unlock access to the dataset. The policy object protecting the dataset will unlock access to the dataset only if the credentials contain suitable claims AND if the credentials are signed (i.e. vouched by) an issuer object trusted by this policy object. You will, acting as the Dataset Owner, setup the policy object in the next step.
Part 3 — Dataset Owner publishes dataset behind policies
Now the Dataset Owner stands up a guardian for storing the dataset, and registers the policies
🔁 Switch identity to
data_owner.
3.0 Dataset file
For the tutorial's sake, the dataset is a single small file. It is already created for you at /tmp/asset_data.txt — you don't need to create anything.
3.1 Register the asset (and start its guardian)
- Go to Assets (navbar) → + Register Asset.
- Name:
data1. Data Path:/tmp/asset_data.txt→ Register Asset. - Registration takes a few seconds — the app is also starting a guardian for the data and waiting for it to come up.
What's happening: registering the asset also starts a guardian that serves /tmp/asset_data.txt. Open data1 and you'll see "Your asset is behind the guardian running on http://‹host›:‹port›." The asset still needs a policy before anyone can use it — that's next.
3.2 Expose the asset behind the policy
- Still on
data1, click Expose → the Expose Asset modal opens. - Under Policies, check Geographic-restriction and Institution-specific-restriction. (Use View to read policy card.)
- The Policy Data box auto-fills with the merged schema. Replace it with real values:
- Under Trusted Issuers, click + Add a Trusted Issuer twice, once for each issuer object from Part 2:
- First box: paste
ISSUER_DIDfrom step 2.1 into the DID field, and checkLocationCredentialandAffiliationCredential. - Second box: paste
BINDING_DIDfrom step 2.2 into the DID field, and checkpublicKeyCredential. - Click Create Policy & Expose.
What's happening: this attaches the policy to the asset — the two policies plus the allowed values you entered — and records which issuer objects it trusts, and for which credential types. The geographic rule asks for a location in an allowed country plus the user's session key; the institution rule asks for membership in an allowed institution plus the session key — both about the same person — and every such credential must be signed by a Trusted Issuer object. Without trusting ISSUER_DID for the location/affiliation credentials and BINDING_DID for the session-key credential, the user's credentials would be present but rejected as coming from an unknown source (or missing entirely). Also, if you put different allowed values (e.g., removed US and used some other country), the policy will also result in a denial, since the data_user in this tutorial is given a credential claiming they are in the US.
The asset is now fully published: dataset behind a guardian, gated by a policy that trusts both issuer objects.
Part 4 — Dataset User downloads the dataset
Finally, the Dataset User requests to download the dataset.
🔁 Switch identity to
data_user.
- Go to Assets. The
data1card now shows an enabled Use button. - Click Use → in the modal, select your wallet under User wallet → Request Download.
- After a moment, the Decrypted Data panel appears showing:
What's happening in the background (the whole handshake, end to end):
- The app checks whether the policy requires a
publicKeyCredentialand whether thedata_userwallet already has one. It doesn't yet, so the app asks the trusted session-key issuer object (BINDING_DID) for one — it generates a fresh session key and issues thepublicKeyCredentialautomatically, with no extra step from you. - The app gathers the Dataset User's credentials (session key, location, affiliation) into a single request.
- The policy checks that each credential is signed by a Trusted Issuer object and that both policies pass — and since the same person satisfies both, it approves the request and issues a capability package containing the user's session key.
- That capability package goes to the guardian, which encrypts the file to the user's session key and returns it.
- The app decrypts it with
data_user's private session key and shows you the data.
End of Tutorial: What you just built
manual issuer object       ──signs──►   2 credentials (location · affiliation)
                                        │
session-key issuer object  ──issues──►  publicKeyCredential (session key)   (at download time)
                                        │ stored in
                                        ▼
                                        data_user's wallet
                                        │ presents
                                        ▼
                                        Policy (geographic + institution policies)
                                        │ trusts both issuer objects
                                        │ checks the policies
                                        ▼
                                    capability ──────────►  guardian
                                                             │ encrypts the file to
                                                             │ data_user's session key
                                                             ▼
data_user  ◄── decrypt with private session key ──────  encrypted file
IMPORTANT: The Dataset Owner never saw the Dataset User's credentials, the Guardian never evaluated the policies, and the dataset was downloaded from the Guardian encrypted to a key only the compliant Data User* holds.